When I made my first girls version of the Geneva cardigan, in my head I was planning out boys options already. I loved the ribbed band option the moment I saw it, and immediately thought it would look awesome with a zipper. Boys love zippers and putting a zipper in any garment is basically a guarantee for a happy kid around here.
Since the pattern already has more options than you can reasonably ask from a pattern designer, I decided to hack it. And to put together a tutorial for all of you to enjoy (keep reading if you want to see it).
This post is part of a fun blogtour showcasing lots of lovely Geneva cardigans. Do check them out if you want to see some truly inspirational examples:
And today is the last day you can buy any Coffee&Thread pattern with a 15% discount with the code 'GENEVAPATTERNTOUR'
Zipper tutorial
Attach the ribbed neckband following the instructions and make sure the neckband ends just next to the zipper.
Anna's Heirloom Boutique | Wondermirakel | Daya_sews | S is for sewing | frl.love | Molemiekes naaiblog
And today is the last day you can buy any Coffee&Thread pattern with a 15% discount with the code 'GENEVAPATTERNTOUR'
Zipper tutorial
For a size 11 cardigan I used a 45 cm separating zipper, some thin interfacing and regular single fold bias tape.
First redraw your front bodice pattern piece. Draw 2 new lines at 0.5 cm distance perpendicular to the center front line. One will be your new fold line the other one is the cutting line and marks the seam allowance. Cut your fabric along the new cutting line and interface the seam allowance with a 1.5 cm wide strip of thin interfacing.
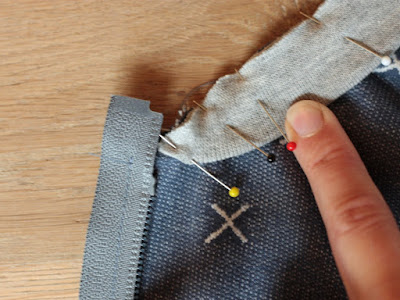
Separate the zipper and put one half facing down (right side of zipper facing right side of fabric) with the zipper stop at 1 cm below the neckline. Measure the width of your zipper and make sure the middle of the zipper teeth are placed exactly at 1.5 cm from the edge of the fabric. Pin and sew the zipper at 1 cm from the fabric edge. Repeat on the other side.
Attach the ribbed neckband following the instructions and make sure the neckband ends just next to the zipper.
Now fold the zipper outwards on both sides, making it dissapear between two layers of fabric. Pin your bias tape on top with the right side facing down and sew with 1 cm seam allowance. Clip corners and turn. Sew pockets and sleeves as described in the instructions.
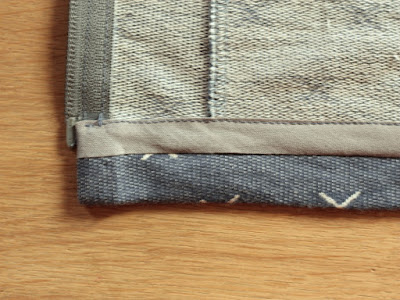
Attach bias tape to the bottom hem at 0.7 cm from the edge.
Fold the bias tape upwards and fold your hem allowance upwards. The right side of the zipper faces down on the right side of the fabric.
Stitch a vertical line extending the stitching line on the zipper. Clip corners and turn.
Topstitch the bias tape close to the edge.
Topstitch along zipper and neckband as described in the instructions. Make sure to catch the zipper in the topstitching.
And now enjoy your zippered cardigan!


Great tutorial! I want to try making a zippered version, too!!
BeantwoordenVerwijderenCan't wait to see!
VerwijderenSuper, dankjewel voor de handleiding!
BeantwoordenVerwijderenGraag gedaan :)
VerwijderenThis is so awesome love how it turned out! 💙💙💙
BeantwoordenVerwijderenThanks! And guess what, my son loves it too!
VerwijderenSuch a great hack!!! Thank you for that tutorial, I would love to try it.
BeantwoordenVerwijderenI bet you would make a stunning cardigan!
VerwijderenDeze ga ik opslaan zie! :)
BeantwoordenVerwijderenOf nog beter: maken! ;-)
VerwijderenWauw, zo mooi en zo netjes afgewerkt. Top!
BeantwoordenVerwijderenThis looks amazing!!!! Thanks for sharing how to add a zipper!!!
BeantwoordenVerwijderen