Pagina's

19 mei 2017

Geneva cardigan with zipper tutorial


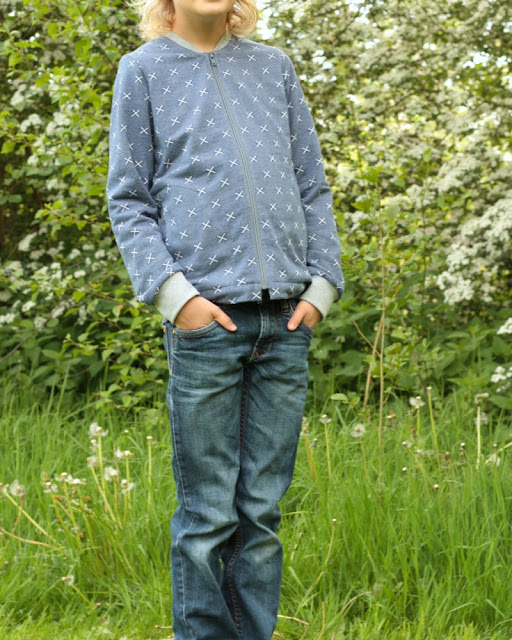
When I made my first girls version of the Geneva cardigan, in my head I was planning out boys options already. I loved the ribbed band option the moment I saw it, and immediately thought it would look awesome with a zipper. Boys love zippers and putting a zipper in any garment is basically a guarantee for a happy kid around here. 


Since the pattern already has more options than you can reasonably ask from a pattern designer, I decided to hack it. And to put together a tutorial for all of you to enjoy (keep reading if you want to see it).


This post is part of a fun blogtour showcasing lots of lovely Geneva cardigans. Do check them out if you want to see some truly inspirational examples:

And today is the last day you can buy any Coffee&Thread pattern with a 15% discount with the code 'GENEVAPATTERNTOUR'


Zipper tutorial


For a size 11 cardigan I used a 45 cm separating zipper, some thin interfacing and regular single fold bias tape.


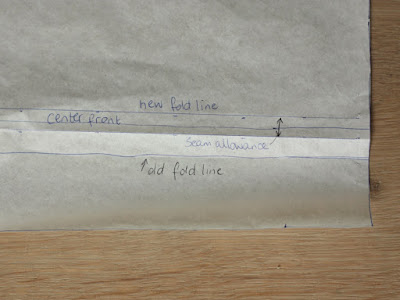
First redraw your front bodice pattern piece. Draw 2 new lines at 0.5 cm distance perpendicular to the center front line. One will be your new fold line the other one is the cutting line and marks the seam allowance. Cut your fabric along the new cutting line and interface the seam allowance with a 1.5 cm wide strip of thin interfacing.


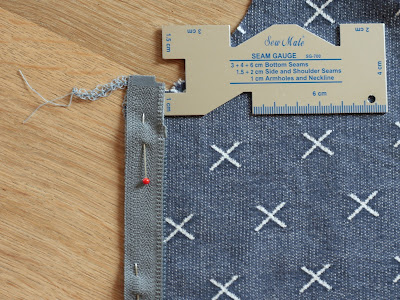
Separate the zipper and put one half facing down (right side of zipper facing right side of fabric) with the zipper stop at 1 cm below the neckline. Measure the width of your zipper and make sure the middle of the zipper teeth are placed exactly at 1.5 cm from the edge of the fabric. Pin and sew the zipper at 1 cm from the fabric edge. Repeat on the other side.


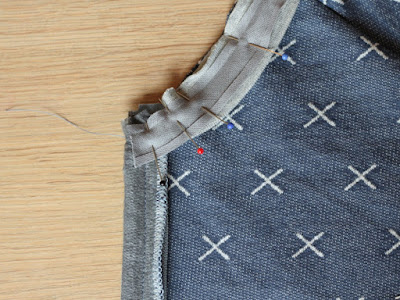
Attach the ribbed neckband following the instructions and make sure the neckband ends just next to the zipper.


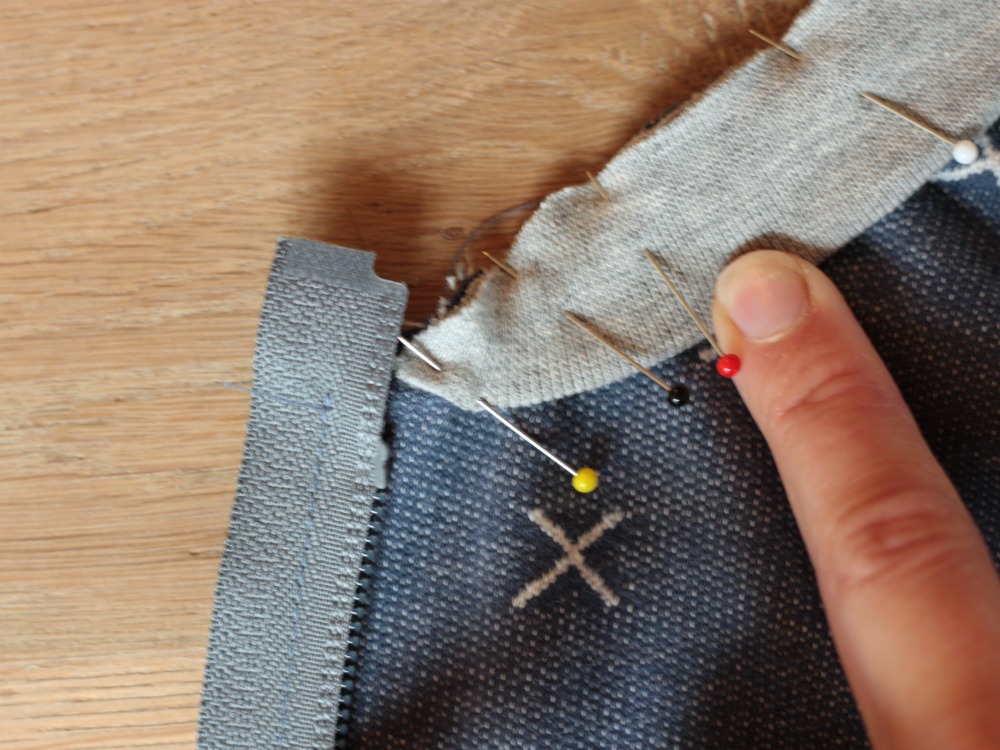
Now fold the zipper outwards on both sides, making it dissapear between two layers of fabric. Pin your bias tape on top with the right side facing down and sew with 1 cm seam allowance. Clip corners and turn. Sew pockets and sleeves as described in the instructions.


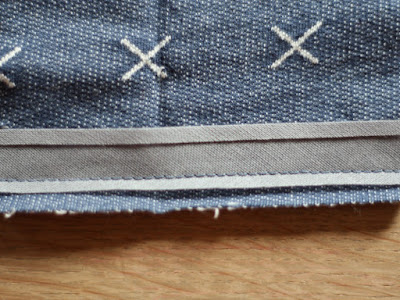
Attach bias tape to the bottom hem at 0.7 cm from the edge. 


Fold the bias tape upwards and fold your hem allowance upwards. The right side of the zipper faces down on the right side of the fabric.
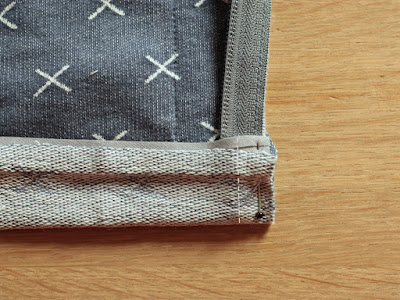
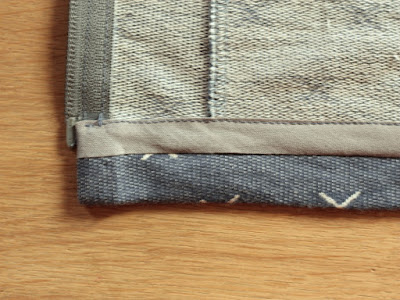
Stitch a vertical line extending the stitching line on the zipper. Clip corners and turn.


Topstitch the bias tape close to the edge.


Topstitch along zipper and neckband as described in the instructions. Make sure to catch the zipper in the topstitching.


And now enjoy your zippered cardigan!


15 mei 2017

Fancy pants


Voor ons moet kleding passen bij de gelegenheid. En wie dagelijks aan slootje springen doet, gaat dus niet vaak op chique. Maar in de wereld van de klassieke muziek gelden dress codes waar de boeven maar wat graag aan meedoen. De Morocco broek van Petit a Petit leent zich perfect voor een echte nette broek. Met glinsterende tuxedo strepen ben je ineens een echte meneer, nietwaar?

For us, clothing has to match the occasion. And kids who jump over ditches daily, don't need a lot of fancy clothes. But the world of classical music has some ancient dress codes that the kids love to comply with. The Morocco pants by Petit a Petit are a perfect pattern for fancy pants. A shiny tuxedo stripe can turn a rascal into a gentleman in no time!


In de lokale winkel vond ik een zwarte katoenfluweel die ik het liefst wilde combineren met strepen in changé zijde. Echte zijde was lokaal onvindbaar, dus nam ik een synthetisch alternatief. Een keuze waar ik tijdens het naaien flink spijt van kreeg omdat het erg kwetsbaar bleek.

The local store carried a black cotton velvet that I wanted to combine with tuxedo stripes in a black/red changé silk. Real silk was impossible to find locally, so I used a synthetic alternative. A choice that I regretted during the sewing process because it proved to be very fragile.


Het patroon wordt geweldig goed uitgelegd, en ondanks dat het een aantal voor mij nieuwe elementen bevatte, was het prima te volgen. De maataanpassingen vergden wel even wat hoofdbrekens. Het kind heeft ongeveer dezelfde heup- als taillemaat, wat resulteerde in een lengte maat 11, taille maat 9 en heup maat 6 volgens de maattabel. Een breedte-aanpassing inclusief de tuxedo streep zou neerkomen op het nagenoeg opnieuw uittekenen van het patroon, en met een optreden in het vooruitzicht koos ik voor de snelle oplossing. Ik ging uit van de taillebreedte en verlengde naar de juiste maat. Resultaat: niet perfect rond de heupen, maar wat had ik dan gedacht?

The pattern instructions are crystal clear, and even though a few elements were new to me, it was easy to follow. The size adjustments were a bit more challenging. The kid has the same hip and waist measurements, resulting in a length 11, waist 9 and hip 6 according to the sizing table. Changing the width in the waist and hip area including the tuxedo stripe would have taken quite some time, and I bailed out and went for the faster solution. I started with the waist size and only lengthened it. The result is too much width around the hips, but what was I thinking anyway?


Dé oplossing om een aansluitende broek te maken voor bonenstaken bedacht ik later pas: Kies in het patroon de optie zonder figuurnaden in een kleinere maat dan de taille. In mijn geval was maat 7 waarschijnlijk goed geweest. Die optie gaat uit van een ruime elastieken sluiting rond de taille, en zolang het maar niet te klein rond de heupen wordt, kun je rustig een (paar) maten kleiner nemen.

It was only later that I figured out the solution for fitted pants for beanpoles without hips: For this pattern, pick the option without darts in a smaller size than the waist size. In my case size 7 would probably have been fine. This option has a wide elastic around the waist, so you could easily pick a smaller size and insert a zipper as long as it doesn't become too small around the hips.


Het kind is dolgelukkig met zijn nette broek en oogstte er al veel complimenten mee. Wat niet weet wat niet deert dus, en het volgende exemplaar past nóg beter!

The kid is very happy with his fancy pants and got lots of compliments already. So I guess the sizing is not a real big issue here, and the next pair will fit even better!

Pattern: Morocco pants by Petit a Petit and Family
Fabric: Cotton velvet

4 mei 2017

Upcycled Geneva cardigan


Hoe graag ik mijn dochter ook in zomerjurkjes zie rondfladderen, helaas betekent lente in ons klimaat ook frequente hagelbuien, nachtvorst en druilerige dagen, wat vraagt om warme laagjes. Toen Coffee&Thread testers nodig had voor een vest, was ik dan ook meteen om.

Unfortunately in our climate not every day in spring is sunny. Frequent hailstorms, nightfrosts and clouded skies create a need for warm layers, even in May. So when Coffee&Thread needed testers for the Geneva cardigan, I jumped on it.


Het Geneva vest dat vandaag gelanceerd wordt, is geschikt voor zowel jongens als meisjes. Kun je je mijn enthousiasme voorstellen toen ik dat zag? Een fijn patroon dat ook geschikt is voor mijn bengels! Echter, de dochter miste echt nog vestjes, dus mijn testversie is de meisjesvariant met Peter Pan kraag.

The Geneva cardigan, releasing today, is meant for both boys and girls. Can you imagine me jumping up and down when I first saw it? Something that is also suitable for my boys, yay! However, the girls' closet was in need of a cardigan most, so my testversion is a girly one with peter pan collar.


Maar eerst over het patroon. Het is een vest met 4 verschillende kraag opties, waarvan twee unisex. Er zijn ook twee verschillende mouwen, zakken en een knoopsluiting. De instructies zijn gedetailleerd en duidelijk en gidsen je naar een nette afwerking, ook aan de binnenkant.

Let me tell you about the pattern first. It's a cardigan with 4 different collar options, two of which are unisex. There are two sleeve types to choose from and optional pockets. It closes with buttons or snaps. The instructions are detailed and clear and aim for neat finishes on the inside, too.


Dit vestje maakte ik uit een oude lamswollen trui. Het kostte bijna meer tijd om uit te puzzelen hoe ik de mottengaatjes kon omzeilen bij het knippen, dan om het in elkaar te naaien. Uiteindelijk kwam ik toch iets stof tekort, wat ik oploste door een stukje tricot aan het knopenpad te zetten. Het speelse randje wat dit oplevert, vind ik stiekem wel een leuk detail.

For this one I upcycled an old lambswoolen sweater. I think it took me more time to figure out how to cut the pattern pieces around the moth holes than actually sewing it! As I ended up running a little short of fabric, I added some of the collar fabric to the front bodice. I like the little detail this adds. The pockets were left out (no more fabric remember?).


Alhoewel dit vest bedoeld was om alvast zomerjurkjes onder te kunnen dragen, claimde dochterlief ineens een schrijnend rokjestekort. En dan geldt 'zij vraagt, wij naaien' nietwaar? Ik maakte dus een supersnel rimpelrokje op elastiek (tutorial hier) van gestreepte double gauze en het kind was zielsgelukkig.

Although this cardigan combines perfectly with dresses, the girl told me her closet was also in desperate need of skirts. So I made her a quick gathered skirt out of double gauze with silver elastic. She totally loves it!


Wil je ook met dit patroon aan de slag? Het is hier te koop met korting, maar als je lid wordt van de Coffee&thread patterns facebook groep, vind je een code voor nog 10% extra korting.

The pattern is on sale here and if you join the Coffee&thread patterns group on facebook you'll find a code for an additional 10% discount.

Pattern: Geneva Cardigan by Coffee&Thread, gathered skirt (tutorial)
Fabrics: Upcycled sweater (cardigan), double gauze (skirt)


3 mei 2017

Juliette dress


Toen Suz van Sewpony en Jill van Kneesocks and Goldilocks de handen ineen sloegen en samen het patroon voor de Juliette dress&top ontwikkelden, wist ik meteen dat dit precies was wat hier in de kast miste. Ik mocht testen en vrees voor het begin van een nieuwe verslaving...

When Suz from Sewpony and Jill from Kneesocks and Goldilocks developed the pattern for the Juliette dress&top together, I knew immediately that this would be the perfect addition to my daughters summer wardrobe. I tested the pattern, and I fear for a new addiction...


De basis is een A-lijn jurk of topje met een grote ruffle-kraag. Door de drie mogelijke mouwlengtes en een optioneel knopenpad is er veel variatie mogelijk.

Essentially this pattern is an A-line dress or top with a big ruffle collar. Three different sleeve lengths and the optional button placket allow for a lot of variation.


Ik koos voor een mouwloze jurk met zakken en knoopsluiting achteraan. Zoals gebruikelijk verlengde ik een maatje. Het jurkje valt precies boven de knie en heeft genoeg bewegingsruimte zonder te wijd te worden.

I made a sleeveless dress with pockets and a button closure in the back. As usual I lengthened by one size, which is really easy to do with this pattern. The dress hits just above the knee and allows for enough freedom of movement without being too wide.


Het patroon is zo gemaakt dat het netjes maar ook snel in elkaar zit. De afwezigheid van rits en knoopsgaten maakt het ook uitermate geschikt voor een beginnende naaister. Typisch een project wat je nog snel even onder de naaimachine gooit wanneer bij het inpakken van de koffer blijkt dat dochterlief nog wel een extra topje voor aan het strand kan gebruiken.

The pattern is well made with clean finishes, but it also comes together quickly. The absence of zippers or buttonholes makes it very suitable for a beginning seamstress as well. It's typically a project you could quickly sew when you're packing suitcases and notice that an extra top for the beach is in order.


Wil je je eigen Juliette maken? In de facebook group van Sewpony vindt je een code waarmee je 10% korting krijgt op het patroon.

Want to make your own Juliette? If you join the Sewpony patterns facebook group, you can find a code there for a 10% discount.


Pattern: Juliette dress&top by Sewpony & Kneesocks and Goldilocks
Fabric: Frisian rose by Westfalenstoffe