Pagina's

Posts tonen met het label jongens. Alle posts tonen

12 november 2017

Trailblazer vest


Sewing for older boys can be quite a challenge. They develop their own style and have lots of opinions about what is cool enough to wear these days. But when I listen to them and sew something that matches with their ideas, they are by far my most grateful customers.


Testing the new kids version of the Trailblazer Vest pattern by Twig&Tale seemed the perfect opportunity to hit the bull's eye. It includes pockets and zipper, a collar and has the opportunity to sew a warm puffer style version, so it's perfect for the grown up look my boys love. There is also a nice windflap, which I omitted in this version, because I wanted those matching chevron stripes to be visible. The instructions are very detailed - there is even a video on how to sew the zipper - and meant to hold a beginner's hand. They walk you through the construction from beginning to end.


The outer fabric is a thin cotton from Michael Miller quilted onto thick and fluffy batting. I had lots of fun playing around with the quilting design and used chevrons, horizontal and vertical stripes and a little piece of piping on the back yoke. With quilting, using piping and colourblocking, the possibilities to get creative are almost endless.
The lining is made out of one of the softest fabrics I've ever worked with: organic cotton sherpa by Michael Miller. Most organic cottons are softer than regular ones, but this one is pure heaven.


Not only does the kid feel cool now, he must be wrapped in the coziest garment I've ever sewn.


This vest exists in a grown-up men's version, too, and there is a lovely fisherman's add-on with lots of extra pockets for treasure hunters of all types. Today is the last day the pattern is on sale, so if you want it, grab it quick!


Pattern: Children's Trailblazer vest by Twig & Tale
Fabric: Michael Miller Cotton couture, color SC5333-META-D (outer)
and Michael Miller organic cotton sherpa (lining)

The fabrics for this vest were kindly sponsored by Michael Miller fabrics.

16 oktober 2017

Stranded sweater


Als de dagen kouder worden, haal ik graag de breinaalden tevoorschijn. Na de noorse jongenstrui van afgelopen winter, lag er nog een bestelling van de andere kinderen. Hier is de David trui die ik voor de middelste breide. 


Hij koos zelf de kleuren wol uit - hij heeft talent, al zeg ik het zelf! En ik veranderde het motiefje om plaats te maken voor wat sterren in de schouderpas. Aantallen steken en dus maatvoering zijn precies als in het oorspronkelijke patroon.


De trui wordt naar goed scandinavisch gebruik van boven naar beneden gebreid, top down noemen ze dat. Zo hoef je na afloop geen stukken meer in elkaar te zetten. Sinds ik deze manier van breien voor het eerst bij dit peutervestje leerde, wil ik het liefst nooit meer anders.


Patroon: David sweater by Drops Design
Yarn: Drops Karisma colours 57, 45 and 77

19 mei 2017

Geneva cardigan with zipper tutorial


When I made my first girls version of the Geneva cardigan, in my head I was planning out boys options already. I loved the ribbed band option the moment I saw it, and immediately thought it would look awesome with a zipper. Boys love zippers and putting a zipper in any garment is basically a guarantee for a happy kid around here. 


Since the pattern already has more options than you can reasonably ask from a pattern designer, I decided to hack it. And to put together a tutorial for all of you to enjoy (keep reading if you want to see it).


This post is part of a fun blogtour showcasing lots of lovely Geneva cardigans. Do check them out if you want to see some truly inspirational examples:

And today is the last day you can buy any Coffee&Thread pattern with a 15% discount with the code 'GENEVAPATTERNTOUR'


Zipper tutorial


For a size 11 cardigan I used a 45 cm separating zipper, some thin interfacing and regular single fold bias tape.


First redraw your front bodice pattern piece. Draw 2 new lines at 0.5 cm distance perpendicular to the center front line. One will be your new fold line the other one is the cutting line and marks the seam allowance. Cut your fabric along the new cutting line and interface the seam allowance with a 1.5 cm wide strip of thin interfacing.


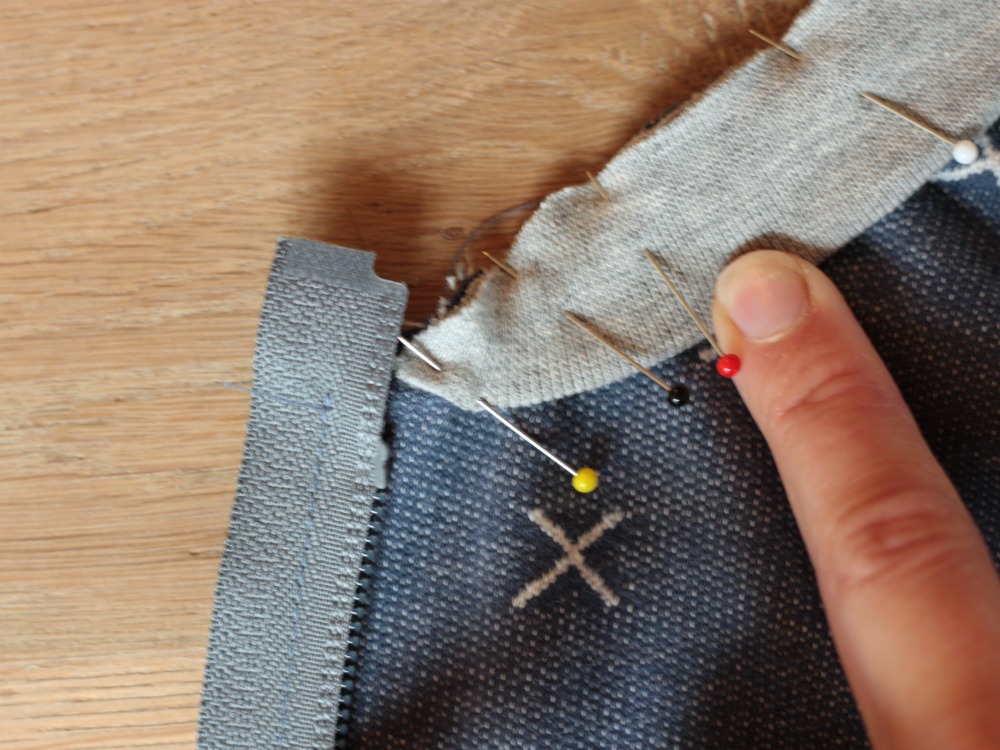
Separate the zipper and put one half facing down (right side of zipper facing right side of fabric) with the zipper stop at 1 cm below the neckline. Measure the width of your zipper and make sure the middle of the zipper teeth are placed exactly at 1.5 cm from the edge of the fabric. Pin and sew the zipper at 1 cm from the fabric edge. Repeat on the other side.


Attach the ribbed neckband following the instructions and make sure the neckband ends just next to the zipper.


Now fold the zipper outwards on both sides, making it dissapear between two layers of fabric. Pin your bias tape on top with the right side facing down and sew with 1 cm seam allowance. Clip corners and turn. Sew pockets and sleeves as described in the instructions.


Attach bias tape to the bottom hem at 0.7 cm from the edge. 


Fold the bias tape upwards and fold your hem allowance upwards. The right side of the zipper faces down on the right side of the fabric.
Stitch a vertical line extending the stitching line on the zipper. Clip corners and turn.


Topstitch the bias tape close to the edge.


Topstitch along zipper and neckband as described in the instructions. Make sure to catch the zipper in the topstitching.


And now enjoy your zippered cardigan!


15 mei 2017

Fancy pants


Voor ons moet kleding passen bij de gelegenheid. En wie dagelijks aan slootje springen doet, gaat dus niet vaak op chique. Maar in de wereld van de klassieke muziek gelden dress codes waar de boeven maar wat graag aan meedoen. De Morocco broek van Petit a Petit leent zich perfect voor een echte nette broek. Met glinsterende tuxedo strepen ben je ineens een echte meneer, nietwaar?

For us, clothing has to match the occasion. And kids who jump over ditches daily, don't need a lot of fancy clothes. But the world of classical music has some ancient dress codes that the kids love to comply with. The Morocco pants by Petit a Petit are a perfect pattern for fancy pants. A shiny tuxedo stripe can turn a rascal into a gentleman in no time!


In de lokale winkel vond ik een zwarte katoenfluweel die ik het liefst wilde combineren met strepen in changé zijde. Echte zijde was lokaal onvindbaar, dus nam ik een synthetisch alternatief. Een keuze waar ik tijdens het naaien flink spijt van kreeg omdat het erg kwetsbaar bleek.

The local store carried a black cotton velvet that I wanted to combine with tuxedo stripes in a black/red changé silk. Real silk was impossible to find locally, so I used a synthetic alternative. A choice that I regretted during the sewing process because it proved to be very fragile.


Het patroon wordt geweldig goed uitgelegd, en ondanks dat het een aantal voor mij nieuwe elementen bevatte, was het prima te volgen. De maataanpassingen vergden wel even wat hoofdbrekens. Het kind heeft ongeveer dezelfde heup- als taillemaat, wat resulteerde in een lengte maat 11, taille maat 9 en heup maat 6 volgens de maattabel. Een breedte-aanpassing inclusief de tuxedo streep zou neerkomen op het nagenoeg opnieuw uittekenen van het patroon, en met een optreden in het vooruitzicht koos ik voor de snelle oplossing. Ik ging uit van de taillebreedte en verlengde naar de juiste maat. Resultaat: niet perfect rond de heupen, maar wat had ik dan gedacht?

The pattern instructions are crystal clear, and even though a few elements were new to me, it was easy to follow. The size adjustments were a bit more challenging. The kid has the same hip and waist measurements, resulting in a length 11, waist 9 and hip 6 according to the sizing table. Changing the width in the waist and hip area including the tuxedo stripe would have taken quite some time, and I bailed out and went for the faster solution. I started with the waist size and only lengthened it. The result is too much width around the hips, but what was I thinking anyway?


Dé oplossing om een aansluitende broek te maken voor bonenstaken bedacht ik later pas: Kies in het patroon de optie zonder figuurnaden in een kleinere maat dan de taille. In mijn geval was maat 7 waarschijnlijk goed geweest. Die optie gaat uit van een ruime elastieken sluiting rond de taille, en zolang het maar niet te klein rond de heupen wordt, kun je rustig een (paar) maten kleiner nemen.

It was only later that I figured out the solution for fitted pants for beanpoles without hips: For this pattern, pick the option without darts in a smaller size than the waist size. In my case size 7 would probably have been fine. This option has a wide elastic around the waist, so you could easily pick a smaller size and insert a zipper as long as it doesn't become too small around the hips.


Het kind is dolgelukkig met zijn nette broek en oogstte er al veel complimenten mee. Wat niet weet wat niet deert dus, en het volgende exemplaar past nóg beter!

The kid is very happy with his fancy pants and got lots of compliments already. So I guess the sizing is not a real big issue here, and the next pair will fit even better!

Pattern: Morocco pants by Petit a Petit and Family
Fabric: Cotton velvet

14 april 2017

Coffee&Thread blogtour: Travelling in style


 Today is the last day of the big Coffee&Thread pattern tour, and it's my turn to show you my makes. Make sure to read until the end of this post; there is a great discount and a major giveaway!


I'm a big fan of Olga's patterns and tested several of them. The Eleena and Ila dress made it onto the blog, the Ania tunics somehow didn't. The patterns are all very well made and have a nice vintage vibe to them. And Olga is such a sweet and encouraging person... So of course I said yes when I was invited for this huge pattern tour celebrating everything Coffee&Thread.


We were given a complete carte blanche as to what we would make. Normally I would go on a total hacking expedition, but this time I didn't. And that really means one thing: I just love these patterns the way they are.


The Mulberry tunic was the first pattern I bought from Coffee&Thread years ago, but somehow I never sewed it. I once taped and traced it, but life happened and that was it. Shame on me, because it's such a nice one, both for boys and girls. I wanted a very simple and natural look, and omitted pocket and button loop. The beautiful sand coloured double gauze is enough.


The Polina dress is a very recent pattern and makes for a perfect twirling party dress. The dress has different options (don't we all love options?) and I made the long frills combined with a full circle skirt. The girl insisted that she did not want ties, which would have made the dress even more festive. My fabric was wide enough to cut a full circle without seams.  I used the same Kokka double gauze, in a dusty peach colour. The bodice was spiced up with some Nani Iro. The only small hack I performed, was cutting the bodice and sewing the frills in between instead of topstitching them onto the outside.


The weather is still quite chilly around here, so brother and sister decided it was time to travel to somewher warm and started packing. 'I'll carry the suitcase, don't forget your hat, sis!' And off they went, looking for blossoms and sunshine.


Fabrics: Kokka double gauze 'sand' and 'dusty peach' and Nani Iro
Patterns: Mulberry tunic and Polina dress from Coffee&Thread


In case you haven't already, do go and check out the rest of the blogtour. The lineup is truly amazing and I've seen nothing but fabulousness!


April 3
Enjoyful Makes || Idle Sunshine || ZowieZo Handmade || Angie Burgett

April 4

Handmade Frenzy || Replicate Then Deviate || Fairies, Bubbles & Co || Coral + Co

April 5

Made By Sara || Naeh-Connection || The Bag of Unexpected || Circle Meets Line

April 6

Skirt Fixation || Sewing Like Mad || Hello Holli || Buzzmills ||

April 7

Little Cumquat || Thread Bear Garments || Pearl Berry Lane || Plus 2 is 5 || Sew Chibi 

April 10

Stahlarbeit || Knee Socks and Goldilocks || Bonnie and Lottie || Sew Sophielynn 

April 11

Mouse House Creations || While She was Sleeping || Mix it Make it || By Dagbjort 

April 12

Gaafmachine || Beletoile || LBG Studio || My Cozy Co  || As It Seams

April 13

Moineau & Petit Pois || Just Add Fabric || Sweeter Than Cupcakes || Frances Suzanne || Sew Liberated 

April 14

Stitched Together || S is for Sewing || Boevenbende || Lafolie Sewing Booth || Sew Pony ||
With Love By Eva 


Now a celebration means there is also something in it for you: a discount and a giveway!

You'll get a 20% discount on all Coffee&Thread patterns with the code 'COFFEEANDTHREADTOUR'.


And last but not least there is a huge giveway where you can win:

- All Coffee&Thread patterns
- A $40 gift certificate to Imagine Gnats
- A $50 gift certificate to Raspberry Creek fabrics
- Three yards of fabric from the fabric fairy
- A $25 gift certificate to Hawthorne threads
- Two english womens patterns from Nähconnection

Isn't that crazy? Go for it and fill out the rafflecopter!

a Rafflecopter giveaway

20 februari 2017

Twig&Tale blogtour: Upcycled Pixie Pea Coat


Upcycling is een van mijn grote liefdes. Gerecykleerde kleding is uniek, milieuvriendelijk en kan extra speciaal worden door het gebruik van materiaal waar al herinneringen aan verbonden zijn. Heel verbazend is het dus niet dat er hier altijd wel iets ligt te wachten om gerecykleerd te worden.

Upcycling really makes my heart beat faster. Upcycled clothes are unique, environmentally friendly and can become extra special when using materials with memories. It shouldn't be a surprise that I have a special stock of things 'to be upcycled'.


De uitnodiging voor een Upcycling Blogtour bij Twig&Tale was precies de virtuele schop die ik nodig had om iets aan die almaar groeiende recykleer-stapel te doen. Ik viste er een wollen deken uit die al even lag te wachten op verwerking tot een jas. Perfect voor de Pixie Pea Coat! Dit patroon is een snelle en eenvoudige jas; ideaal voor een vlotte upcycling-actie en zeer geschikt voor beginnende naaisters. Voor een extra dosis schattigheid is er een optionele kabouterpuntmuts, of je kunt de jas omtoveren tot allerlei beestachtige creaturen met de Wild Things add-on.

The invitation for an Upcycling Blogtour at Twig&Tale was just the virtual kick in the ** I needed to start doing something about that ever growing upcycling pile. I picked out a woolen blanket that was long meant to be turned into a coat. Perfect for a Pixie Pea Coat! This pattern is a quick and easy coat; ideal for a fast upcycling project and very suitable for beginning seamstresses. For some extra cuteness there is a Pixie hat option, or you can turn the coat into all sorts of animals using the Wild Things add-on.


Mijn bink zette resoluut een streep door alle schattigheid, maar was wel te porren voor een paar stoere toevoegingen die de jas wat extra weerbestendigheid geven. Onze Pixie Pea Coat hack is voorzien van een rits, een houtje-touwtje sluiting die de ritsflap dicht houdt én mouwboorden met duimgaten! Een makkelijke duimgaten tutorial vind je hier.

My rascal wanted nothing to do with cuteness, but he was quite keen to add a few 'cool' details that make the coat a bit more weatherproof. So our Pixie Pea Coat hack is featuring a zipper, toggle buttons to keep the zipper flap closed and cuffs with thumb holes. An easy (dutch) thumbhole tutorial can be found here.


Voor de buitenstof gebruikte ik een originele wollen AaBe deken, het label verstopte ik binnenin de jas. Net als bij deze jas behandelde ik de wol voor het naaien met een lanolinebadje, voor wat extra vocht- en vuilafstotendheid. De voering is het hemeltje dat jaren boven boevenbedjes hing. De leertjes voor de houtje-touwtje sluitingen knipte ik uit een paar versleten schoenen. Upcycling voor fanaten! Bij gebrek aan de juiste machinenaalden voor de taaie suede - daar kwam ik natuurlijk achter toen ik net terúgkwam uit de fourniturenwinkel in de stad - naaide ik de leertjes met de hand op de jas. Au!

The outer fabric is an original woolen blanket of the brand AaBe, a Dutch company that has made blankets out of 100% wool for two centuries. I really wanted to reuse the label (it says it's moth resistant forever, haha!), so I sewed it onto the coat lining. The lining is the boys old crib canopy. To obtain leather for the toggle button closures I cut up an old pair of boots. Silly enough I forgot to buy leather needles, so I ended up sewing them on by hand. Don't try this at home, ouch!


Zelden heb ik het mannetje zo stinkend wijs gezien met een nieuwe jas - die ook nog zelden zo uniek én goedkoop was!

The boy was so happy to wrap himself up in his new coat, that apart from quite a few happy sewing hours only cost me a few bucks!


Neem voor meer inspiratie vooral ook een kijkje bij de rest van de blogtour deze week:


Pattern: Pixie Pea coat by Twig&Tale. Tutorial for a concealed zipper in this coat can be found here, thumbhole tutorial here.

Fabric: upcycled blanket.


22 januari 2017

The vikings are coming!


In de kerstvakantie maakte de naaimachine tijdelijk plaats voor en berg wol een een bonte verzameling breipennen. Wanneer de dagen op hun kortst en grauwst zijn, weet ik niets knussers dan de tijd door te brengen met een groeiende lap warme wol op schoot. Tot mijn verbazing schoot het nogal op, zodat de eerste trui en muts precies klaar waren toen het begon te vriezen.


De muts is een relatief eenvoudig ontwerp naar een gratis patroon. Het leent zich heel goed voor wie het breien met twee draden eens wil proberen. Het ontwerp is ruim (slouchy), maar wie liever een gewone dopmuts wil, kan ook wat eerder na de boord met het kleurwerk beginnen.


De trui breide ik naar een - eveneens gratis - patroon van Drops design, dat van boven naar beneden rond gebreid wordt. Het motief op de pas veranderde ik wat, maar de maten zijn precies hetzelfde. Achteraf bezien had ik net zo goed een maat kleiner kunnen kiezen, maar gezien de uren die erin zitten vind ik het wel een fijn idee dat de trui nog een paar jaar mee kan. Zou het waar zijn dat jongens de echte groeispurt pas met een jaar of 14 krijgen?


En als jullie me willen verexcuseren, ga ik nu snel terug naar de breipennen; de andere boefjes hebben ook een bestelling geplaatst...

Patroon trui: David trui
Garen: Karisma van Drops design


During christmas break, the sewing machine was temporarily replaced by lots of wool and knitting needles. When the days are short and grey, I so enjoy spending my days knitting! To my own surprise it went really fast and I finished the first sweater right before some cold weather hit us..


The slouchy hat is a relatively easy design, knit from a free pattern. It's perfect for anyone wanting to try their hand at colourwork for the first time.


The sweater is knit from another free pattern, by drops design. I changed the yoke pattern a bit, so I could include some stars. The fit is quite roomy, so I hope my boy can wear it for a few more years. Let's hope it's true that most boys don't get the real growth spurts until they are fourteen or so...


And if you will excuse me, I'll run back to the knitting needles; the other rascals have also placed orders...

Pattern sweater: David trui
Yarn: Karisma by Drops Design